Cómo hacer
How to tie knots with animated images easy
The KNOTS
The tie is very important, since in any case, the tie is the only fantasy that can afford a gentleman.
There are different types of knots, but the most used today are the American knot and the Windsor, with its variants.

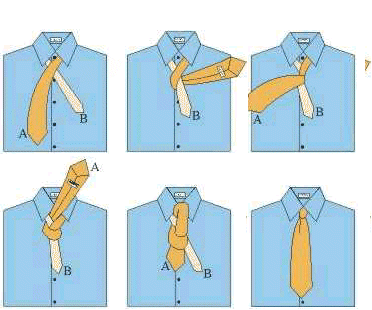
American fourinhand knot, also known as four-in-hand, it is easier to make than the typical English knot. It also allows you can do to tie a bit thicker. This knot abusive least tie, because it means less money from it.
1. Put the tie around the neck, with the end point A (right) longer than the end B (left) and crossed A over B.
2. Pass the end A under B.
3. Back to happen again before the end A of B.
4. Pull the A all the way up, passing down end B to have closer to the neck, forming a knot.
5. Hold the knot ahead smoothly, with the index finger, brings the end under the loop formed by the last lap of A and pull the A down.
6. Adjusted by sliding the knot up, so it is comfortable on the neck, while holding the end B.
————————————————– ———–

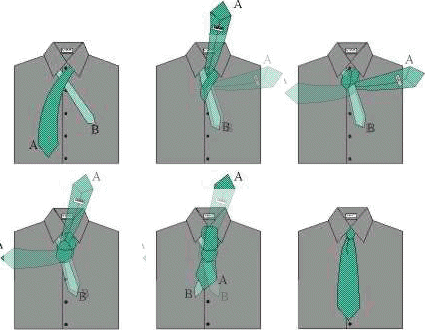
Windsor On the other hand, the Windsor knot, known as English, is a bit more complicated to do, and considered by some as «boring», as always, but always stays the same, whereas the American node, varies depending on tie.
1. Put the tie around the neck, with the end point A (right) longer than the end B (left)
2. Cross A over B.
3. Enter the end A below B above pulling it out, forming a knot.
4. A tip strip below B to the left, below the knot.
5. Cross the end A ahead of B from left to right.
6. A full strip end up under the knot.
7. Download and insert the end A in the loop formed by the last lap that gave the extreme A.
8. With both hands pull the knot and adjust the neck so you do not cut your breath
————————————————– ————

Medwinsor
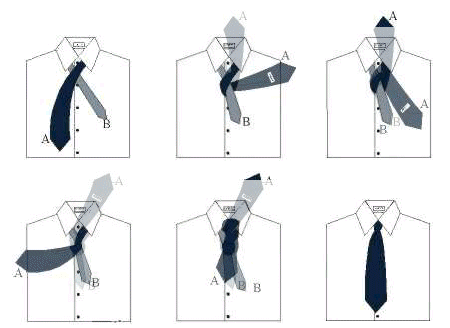
The most widely used variation of Windsor, the Windsor Middle (Windsor simple or Spanish) is to give a lap down in the traditional, and always elegant Windsor Knot.
1. Put the tie around the neck, with the end point A (right) longer than the end B (left)
2. Cross A over B.
3. To pass the end around and below B.
4. Take the end A upwards.
5. Enter the end A back, pulling it under and so that it forms a knot.
6. Take the end A ahead of B, from left to right.
7. Once again, insert the end A under the knot, pulling it out from above.
8. Bring the end under the knot to pass in front of the loop formed by the last lap that gave the extreme A.
9. With both hands, tighten the knot and gently ajústatelo neck: you know, that is not broken, but that allows you to keep breathing.


